







You’ve found the campsite, booked the weekend, and noticed one detail: there are no electrical hookups. Now you’re wondering whether a portable power station can keep the fridge cold, charge your phones, and leave enough energy for coffee in the morning.
I would start with your version of a good weekend. Someone who wants lights and a charged laptop has a different job to solve than someone who needs air conditioning through a hot night. Both are reasonable requests. They just lead to different equipment and charging plans.
Let’s work through what your RV already powers, what a portable station would add, and how to budget for a full stay. We’ll use a two-day example and actual Jackery specifications, with the assumptions visible so you can replace them with your own numbers.
Can a portable power station run an RV?
Yes, a suitable portable power station can run individual RV appliances and, with an approved electrical arrangement, supply an RV through its shore-power inlet. Whether it lasts for your trip depends on the combined loads, battery capacity, and energy you can replace while camping.
There is no single size that covers every RV. The connection must suit the RV’s electrical system, the station must handle the equipment running together, and the battery must last between charging opportunities.
Those are three separate checks. Passing one does not automatically pass the others. A station can have enough battery for the weekend but the wrong connection, or enough output to start an appliance but too little stored energy to run it for long.
First, find out what your RV already runs without hookups
Before we add another battery, I would look at the one you already have. Your RV’s house battery, sometimes called its auxiliary battery, supplies the living area’s battery-powered equipment. It is a different role from the battery that starts a motorhome’s engine.
Many RVs have both a 12V DC system and a 120V AC system. Think of these as two electrical paths serving different equipment. Interior lights, water pumps, and some appliance controls commonly use the 12V side. Household-style outlets and many larger appliances use the AC side.
A converter changes incoming AC electricity into DC electricity for the RV’s low-voltage system and battery charging. An inverter works in the other direction, turning battery energy into AC electricity. Some RVs combine functions in an inverter/charger.
You do not need to become an electrician to make a buying decision. You do need to identify which equipment you have. Find the RV manual, the house-battery information, and the converter or inverter/charger model.
Your refrigerator deserves its own check
“RV refrigerator” does not describe one electrical load. Check its model and operating instructions:
- A 12V refrigerator uses the RV’s DC system. It does not become an ordinary plug-in AC appliance because a power station is nearby.
- A residential-style refrigerator needs AC power, potentially supplied by the RV’s installed inverter when hookups are absent.
- A gas/electric refrigerator has model-specific operating modes. Verify both the selected mode and any electrical supply its controls require.
Also check what happens when external AC appears. An automatic setting may change an appliance’s energy source. I would confirm the fridge and water-heater settings before assuming they stay on the mode used during your last camping trip.
The 2026 Jayco Family Towable manual is one manufacturer example covering separate electrical systems, converters, and different refrigerator arrangements. Your own RV and component manuals decide what applies to your rig.
Choose between two ways of using the power station
Power selected appliances directly
You might plug a laptop charger, compatible portable refrigerator, or other individual appliance into the station’s appropriate output. The RV’s existing house battery continues serving its own equipment.
This can be a straightforward choice when you only need a few extra comforts. It also makes the energy budget easier to separate: the power station supplies the devices connected to it; the RV battery supplies the rest.
It does not automatically energize your RV’s built-in outlets, ceiling lights, or hardwired appliances. Keep a separate plan for those loads. Check every appliance’s voltage, connector, startup needs, and instructions before connecting it.
Supply the RV through its shore-power inlet
Shore power is the external AC supply your RV normally receives at a campsite. Some power stations can serve as that source when the exact station, RV, cord, protection equipment, and connection arrangement are approved for use together.
This route can make the RV’s existing distribution system useful, but it also brings more loads into the picture. The converter may start charging the house battery. A water heater may select electric operation. Equipment you did not touch can begin drawing power.
I would choose this route only after checking the whole arrangement. Never feed a power station into an ordinary RV wall outlet or use a cord with exposed male plugs at both ends. The designated inlet and approved electrical equipment exist for a reason.
asking it to do?
↓
Compatible individual devices
↓
Approved shore-power connection
↓
RV circuits, including converter loads
A 30-amp plug is not the whole compatibility check
Start with the RV’s service rating and the actual plug designation. In a typical U.S. arrangement, 30A RV service uses a 120V TT-30 connection. Standard 50A RV service has two 120V legs, with up to 50A on each leg. It is not simply a slightly larger version of one 30A supply.
The familiar nominal service capacities are 3,600W for 120V × 30A and 12,000W across both legs of a full 50A, 120/240V service. Those numbers describe the service, not what your RV constantly consumes or what a portable station automatically supplies.
Read the labels rather than choosing by appearance. TT-30 and locking L5-30 connectors are different. A household-style outlet, an RV outlet, and a dryer outlet are not interchangeable because their current ratings sound similar.
Check the RV instructions before buying an adapter
Some setups permit a correctly specified adapter; others do not. The Jayco manual linked above explicitly prohibits adapters and extension cords for its covered shore-power connections and specifies the appropriate service and receptacle.
If your manual has that restriction, an adapter listing or a forum recommendation does not override it. Ask the RV manufacturer about the proposed source. An adapter also cannot increase a station’s output or turn a single 120V supply into full 50A campground service.
Confirm grounding and protection compatibility
There is a model-specific detail with the Jackery HomePower 3000: its manufacturer product FAQ calls for a grounding adapter for RV use. It also identifies the unit’s TT-30 RV output. I would resolve that requirement with Jackery and the RV manufacturer or a qualified RV electrician before purchasing it for inlet connection.
Have them specify the approved arrangement for your station, RV, and electrical management system, often shortened to EMS. A generic bonding plug is not a universal recommendation. Do not modify grounding or neutral connections yourself, remove ground pins, or bypass protection to make a rejected connection work.
The Progressive Industries EMS manual documents conditions that prevent power reaching an RV. If an EMS reports a fault, record the message and get the cause resolved. Buying a larger battery will not solve an incompatible electrical arrangement.
The load you may overlook: charging the house battery
Imagine connecting your RV and seeing several hundred watts on the station’s display before making coffee. That does not necessarily mean something is broken. The RV may be asking the converter to recharge a depleted house battery.
WFCO’s WF-8900-AD converter manual explains how its power and charging modes respond to the battery and DC loads. The lesson for trip planning is simple: supplying the RV can include supplying its charger.
Arrive with the house battery appropriately charged, then measure what your arrangement uses. If you deliberately plan to refill that battery from the portable station, include the energy transferred and conversion losses. That is useful work, but it is still part of the power station’s workload.
Do not assume switching the converter off is the answer. Depending on the system, it may support equipment you need. Have the RV manufacturer or technician explain the approved operating settings, including any charge-rate controls.
One arrangement to avoid entirely is a charging loop: the station powers the RV while its own AC charging cable is plugged into an outlet supplied by that RV connection. That cannot create energy. Keep the station’s charging source independent of the system it is supplying.
Check what runs together before calculating how long it lasts
Watts describe how much power equipment demands at a moment. Watt-hours describe how much energy it uses over time. You need both numbers, but they answer different questions.
A hypothetical 900W coffee maker and a microwave drawing 1,200W together require 2,100W before counting the converter, fridge, television, or anything else. Running them one at a time reduces that simultaneous demand.
For the microwave, use its electrical input rating, not its advertised cooking output. Our microwave power guide explains that distinction. For motors and compressors, verify documented startup requirements as well as normal operation.
Check the station’s total output, individual outlet limits, cord and circuit limits, and operating mode. Multiple outlets do not each receive the station’s full advertised output independently. A large surge number is not continuous capacity or a guarantee that every compressor will start.
Once the equipment can run together, calculate its energy use. A 900W coffee maker used for ten minutes consumes about 150Wh at its supply: 900 × 10 ÷ 60. A lower-power device left on all day can use more energy than that short burst.
Build one day of camping before sizing the whole weekend
Here is an illustrative day for an RV supplied through an approved inlet connection. These numbers are teaching assumptions, not measured Jackery performance or typical consumption for every camper.
We will assume the converter and all the DC equipment it supplies average 40W at the converter’s AC input over 24 hours. That single allowance includes the hypothetical fridge, lights, pump, controls, and converter losses. It assumes the house battery finishes the day at the same charge level it started.
That last detail prevents us from quietly using the RV battery as extra uncounted storage. It also means we do not add those DC appliances again as separate rows.
| Load | Assumed use | Daily energy |
|---|---|---|
| Converter and all supplied DC loads | 40W average × 24 hours | 960Wh |
| Laptop and phone charging | 65W combined × 2 hours | 130Wh |
| Television | 45W × 2 hours | 90Wh |
| Coffee maker | 900W × 10 minutes | 150Wh |
| Microwave electrical input | 1,200W × 6 minutes | 120Wh |
| Total delivered energy | One 24-hour day | 1,450Wh |
This example excludes air conditioning, electric space heating, electric water heating, other cooking, and additional appliances. If you need them, add them. A cold night requiring a furnace blower changes the DC allowance too.
For cycling equipment, an average is not the same as its running wattage. Measure energy over a representative period using equipment rated for the connection, or have a technician help. A brief 40W display reading cannot establish a 40W daily average.
Allow for the power station’s own energy use
Suppose the station converts battery energy to AC at an assumed 90% efficiency, excluding its own fixed operating overhead. We will separately allow an illustrative 15W of overhead while AC remains enabled all day.
- Battery energy for the delivered loads: 1,450Wh ÷ 0.90 = approximately 1,611Wh.
- Station overhead: 15W × 24 hours = 360Wh.
- Total battery use: approximately 1,971Wh per day.
The 90% and 15W figures are calculation assumptions, not specifications for either Jackery model below. Actual conversion efficiency and overhead vary. If your measured efficiency already includes idle consumption, do not add the same overhead again.
For two identical days, we need approximately 3,942Wh from the battery system before allowing a reserve. That is why simply matching a 1,450Wh appliance total to a similarly sized battery would underestimate the job.
needs more than appliance watts.
Assumed 90% AC conversion efficiency, excluding overhead
Assumed 15W station overhead for 48 hours
What do actual Jackery sizes change?
Let’s compare two products in our catalog. Their names are similar to other Jackery models, so use the exact version and U.S. manual when checking connections.
| Specification | Explorer 2000 v2 | HomePower 3000 |
|---|---|---|
| Nominal battery capacity | 2,042Wh | 3,072Wh |
| Total AC output on battery | 2,200W rated | 3,600W maximum |
| AC outlet arrangement | Three standard AC outlets | Four standard AC outlets plus a 120V, 30A RV outlet |
| Weight | About 39.5 lb | About 59.52 lb |
| Published AC bypass limit | 12A at 100–120V | 12A at 120V, 1,440W |
Sources: the Explorer 2000 v2 manual, JE-2000D, and HomePower 3000 manual, JHP-3000C. The HomePower’s standard outlets have their own 20A/2,400W maximum rating; the 3,600W total is shared across AC outputs.
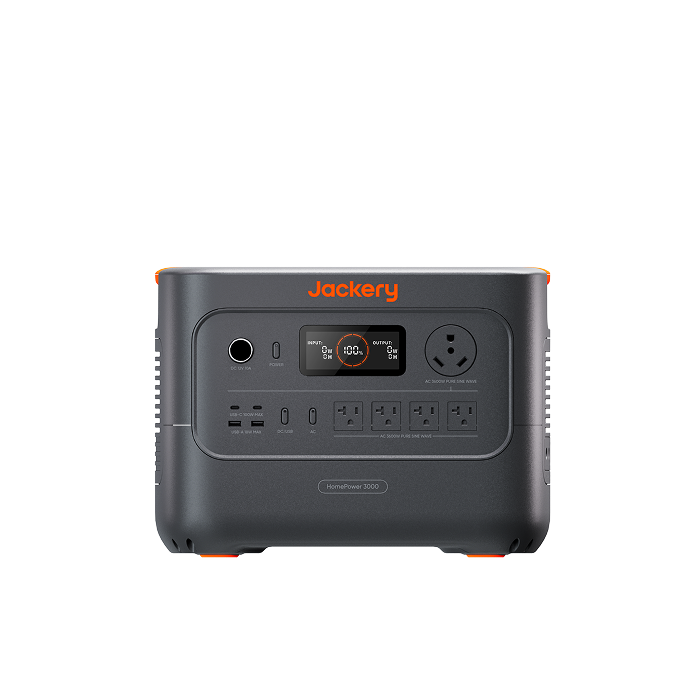
U.S. model JHP-3000C
I would consider the Explorer 2000 v2 for a separately calculated group of directly connected appliances. Its lighter weight may matter when you move equipment between the RV and home. Do not assume an adapter makes it suitable for your RV’s inlet.
The HomePower 3000 offers more stored energy and an RV-style output, making it worth evaluating for the larger job. Its grounding-adapter requirement and your RV’s instructions still need resolving; the table is not blanket connection approval.
Neither comparison should end at wattage. The heavier unit has to fit a permitted operating location, be lifted safely, and leave room for ventilation. Think about who will carry it and where it will live before choosing.
Would a 3,072Wh battery cover this weekend?
Under our assumptions, not without recharging or reducing demand. Start at 100% and choose a planning reserve of 20%. That leaves 80% of nominal capacity available for the trip:
3,072Wh × 0.80 = approximately 2,458Wh available.
Our two-day requirement is approximately 3,942Wh. The gap is about 1,485Wh of additional stored energy needed to complete the weekend while preserving that reserve. Calculations use unrounded values before displaying results.
This is a planning model, not a promise about a battery-percentage display. Temperature, battery age, actual loads, and operating behavior change the result. The reserve is our chosen allowance, not a claim that Jackery requires a 20% cutoff.
With no recharge, the same assumptions call for about 4,928Wh of nominal capacity: 3,942Wh ÷ 0.80, using the unrounded energy requirement. That figure helps define the size of the job; it does not mean any battery with that capacity has the right output or connections.
You could also reduce demand. Halving the assumed converter-side average from 40W to 20W would save 480Wh at the AC output per day, or about 533Wh from the station after our conversion assumption. But you need an actual change in equipment use to earn that saving. Editing the spreadsheet does not make the fridge consume less.
Plan the recharge before counting on a second night
I would identify the next dependable charging opportunity before choosing a smaller battery. A campsite with trees, a short drive, and uncertain access to a wall outlet can be a very different situation from an open site with a verified charging setup.
Solar: count accepted energy, not just panel labels
Suppose a compatible solar arrangement delivers an average 600W to the station’s charging input for three hours while there is room to accept it. That supplies 1,800Wh at the input. With an illustrative 90% charging efficiency, including charging overhead, we credit 1,620Wh to the battery-energy budget.
This does not mean a panel labeled 600W will deliver that average. Weather, shade, panel orientation, temperature, electrical limits, and charging behavior affect the result. It is a worked energy scenario, not a forecast for your campsite.
The HomePower 3000 manual lists up to 1,000W combined DC input within its specified voltage and current limits. The Explorer 2000 v2 lists 400W combined. Our 600W accepted-input scenario therefore is not an Explorer 2000 v2 example, and the HomePower’s headline input alone does not approve a particular panel arrangement.
Use our solar-panel planning guide alongside the exact station and panel instructions. If the RV already has rooftop solar, identify which battery it charges. Energy going into the RV’s house battery is not automatically energy entering the portable station.
What that recharge does to the weekend budget
Under the same assumptions: 3,072Wh starting energy + 1,620Wh credited from charging − approximately 3,942Wh consumed = about 750Wh remaining, or 24.4% of nominal capacity.
That clears our 20% reserve by only about 135Wh. I would call that a narrow planning margin, especially before a real-world trial. A little more consumption or less sunshine could use it up.
The charging must also arrive in time. Enough energy over the entire weekend does not prevent an earlier shutdown if the battery runs low before the sun reaches the panels. If the battery is full, potential solar production cannot all be stored. Count energy the equipment can actually accept.
recharge change?
Driving and AC charging need their own checks
A drive between campsites may help, but the ordinary car socket and an installed alternator charger are different sources. Our car-charging guide explains how to estimate the gain and match the equipment.
If you plan to recharge from a fuel generator, use our generator-charging guide to check source quality, charging demand, placement, and operating requirements. Campground rules and available operating hours belong in the plan too.
Do not assume AC charging leaves full battery-mode output available. The HomePower 3000 manual limits AC bypass operation to 1,440W. A load combination that worked on battery can exceed that limit when AC input is connected. Our guide to using a station while charging explains why operating mode matters.
Air conditioning changes the conversation
If keeping the RV cool is essential to the trip, I would make the air conditioner the starting point of the calculation. Verify its exact electrical supply, running demand, starting requirements, and expected operating time.
A compatible soft-start device can change startup demand, but it does not remove the energy needed while the compressor runs. Our air-conditioner power guide separates the startup check from the runtime question.
For scale, a hypothetical AC load averaging 1,000W over six hours requires 6,000Wh at its supply. That single load is already more than four times the 1,450Wh delivered-energy total in our modest daily example. It is an illustration, not a typical rating for all rooftop units.
Electric space heaters, water heaters, and extended electric cooking deserve the same attention. Short bursts can be manageable; long operating times change the storage and recharge requirements quickly.
If your trip depends on continuous climate control, arrange power that can reliably meet it and a fallback if the primary source fails. A successful five-minute appliance test is not evidence that the campsite will remain comfortable overnight.
Give the station a suitable place inside the RV
The two Jackery manuals used here specify indoor use, including appropriate RV environments. A solar panel’s outdoor rating does not transfer to the power station. Keep the station dry, upright, and ventilated, with the clearances its instructions require.
Plan cable routing without trapping cords in doors or windows, blocking exits, or creating a trip hazard. Do not bury an operating station under luggage or put it inside a closed carrying bag. Secure it for transport and follow its separate restrictions on movement during operation.
Check temperature limits against conditions inside the RV. Both manuals specify charging from 32°F to 113°F, but discharge limits differ. A comfortable weather forecast does not establish the temperature in a closed compartment.
Before the first night, review energy-saving settings, automatic output shutdown, charge limits, and any schedules. Cycling appliances can spend long periods drawing little power. Make sure the selected settings will support their required operation without unexpected shutdown.
Also expect cooling fans when conditions require them. Battery power avoids a combustion engine at the point of use, but “quiet” does not mean every station is silent at every load.
Try a camping day before relying on it at camp
I would test the approved arrangement at home while you still have easy access to help and another power source. You are checking both whether the equipment works and whether the energy budget resembles reality.
- Record the starting point. Note station charge, house-battery charge, enabled outputs, and appliance settings.
- Observe the baseline. Check the demand before adding optional appliances. Investigate unexpected converter or water-heater loads.
- Use your planned routine. Make coffee, charge devices, and use cooking appliances as intended. Verify startup behavior without repeatedly forcing an overload.
- Check an overnight period. Confirm cycling loads remain powered and compare energy consumption with the estimate.
- Test the actual recharge method. Record accepted energy or battery change under known loads and conditions.
- Check both batteries afterward. If the house battery ended lower, some of the apparent runtime came from it. Account for that energy and its eventual recharge.
Use monitoring equipment suitable for the voltage, connector, and current. A household plug-in meter is not a universal tool for a 30A or 50A RV connection. A qualified technician can help establish measurements without opening or improvising electrical connections.
Keep a simple note of what worked, what changed, and how much energy remained. That record is more useful on the next trip than trying to remember whether the battery “seemed fine.”
Questions I would settle before ordering
Does an RV outlet mean the station can run everything?
No. The outlet still has voltage and current limits, the station has a shared output limit, and its battery has finite capacity. The RV connection must also meet the manufacturers’ grounding and protection requirements.
Can I remove the RV’s house battery?
Do not treat a portable station as an automatic replacement. The house battery may serve essential DC equipment and trailer breakaway braking. Keep the RV’s required battery arrangement intact unless its manufacturer approves a different installed system.
Will rooftop solar charge both batteries?
Only if the actual system is designed and approved to do that. Identify the controller, destination battery, connections, and limits. Do not split an existing charging connection between unrelated batteries or assume a solar-ready label establishes compatibility.
Should I buy more capacity or more charging?
More capacity helps carry energy through periods without charging. More charging helps only when an adequate source is available and the station can accept it. Start with your longest realistic gap between dependable recharge opportunities, then compare the weight, space, and cost of covering that gap.
Account for the extras you will actually bring
Before you settle on a battery size, include the smaller plans that make the trip yours. Our coffee maker power guide walks through the morning brew, while the e-bike charging guide covers charging for the next ride. If you carry tools for repairs, use the power tool sizing guide to check starting demand and battery-charger loads. Include these in your daily energy budget alongside the RV’s essential loads.
Once you have a capacity target in watt-hours, compare our power stations under 1kWh, 1–2kWh power stations, and 2–4kWh power stations. Check each model’s usable energy, output, charging limits, and connection requirements before deciding. A capacity category alone does not establish compatibility.
Choose for the weekend you actually want
You do not need to power every possible appliance to have a good trip. You do need a clear agreement with yourself about what stays on, what runs briefly, and what happens if the recharge falls short.
I would settle the connection first, build the daily energy list second, and choose the battery and recharge plan together. That gives you a reason for the equipment you buy and a useful way to check it before leaving.
If you would like help narrowing the options, send us your RV year and model, service rating, fridge type, appliance list, and time between hookups. Tell us whether you want to power appliances directly or use the RV inlet. We can help compare Jackery options, with any grounding, adapter, or installed-system questions resolved by the relevant manufacturers or a qualified RV electrician.


