







You’re back at camp after a good ride, and your e-bike battery is nearly empty. There’s another trail you want to explore tomorrow, but your campsite doesn’t have an electrical hookup.
Can a portable power station get you ready for that next ride?
Yes, a portable power station can charge an e-bike through the bike’s manufacturer-approved AC charger, provided the station meets the charger’s electrical requirements and has enough battery capacity. The charger plugs into the station much as it would plug into a compatible household outlet.
The part I’d help you work through is how much charging you actually need. Getting one bike from 20% to 80% is a different job from refilling two empty batteries twice over a weekend. Let’s build your setup around the riding you want to do.
Start with the charger you already trust
Take the charger supplied with your bike, or one its manufacturer specifically recommends, and look at the label. That’s our starting point.
The power station supplies AC electricity. Your e-bike charger converts that electricity into the controlled DC supply the bike battery needs. The battery’s charging system then manages what it accepts.
For this setup, you keep using the correct bike charger. You aren’t connecting the station’s battery directly to the bike battery, and you don’t need a homemade cable between the two.
If your bike has a removable battery, its manual will explain whether and how you can charge it separately. An integrated battery may need to stay in the bike. That affects where you can set up, especially if the charger requires an indoor location.
Before buying anything, I’d find an appropriate charging spot at your destination. A campsite without a dry, permitted charging area creates a practical problem that a bigger power station won’t solve.
Which numbers matter on your bike and charger?
Several electrical numbers can appear on the same setup. Here’s how I’d sort them out with you.
| Number to find | What it tells you | What you use it for |
|---|---|---|
| Bike battery capacity, in Wh | Nominal stored energy | Estimate how much energy a refill needs |
| Charger AC input: volts, hertz, amps or watts | The supply the charger requires | Check the station’s AC output compatibility and limits |
| Charger DC output: volts and amps | What the charger supplies to its compatible battery | Identify the correct charger and understand its charging capability |
| Bike motor rating, in watts | A motor performance specification | Understand the bike; it does not specify charger input |
A bike advertised with a 750W motor does not automatically need a 750W charger or a station with 750W of AC output. While the bike is parked and charging, the station is powering its charger.
Likewise, “4A charger” usually describes charging current on the battery side. It does not mean the charger draws 4A from a 120V wall outlet.
For a concrete example, Bosch’s US BPC3410 charger label lists 100–120V AC, 50–60Hz, and 3.2A input. Its battery-side output is listed separately as 36V DC and 4A. You can see both on page 376 of the Bosch US manual hosted by Mondraker.
Those specifications belong to that charger. Your own label is the one that decides your requirements.
If the charger lists amps but no watts
Multiplying AC volts by amps gives volt-amperes, or VA. For that Bosch label, 120V × 3.2A is 384VA. That is not evidence that the charger constantly consumes 384W.
I’d compare the charger’s stated input with the station’s voltage, frequency, current limits, and continuous output rating, allowing headroom. If the documentation leaves compatibility unclear, ask the manufacturers about the exact pairing. A suitable plug-in power meter can help measure actual consumption during a supervised charging session; one low reading doesn’t replace the rated-limit check.
If you charge two bikes together, add both chargers’ input requirements and any other simultaneous loads. Having two outlets doesn’t double the station’s total output.
How big is the battery you’re trying to refill?
Look for a watt-hour figure such as 500Wh or 750Wh on the bike battery or in its specifications. This is the number we’ll use for the energy budget.
If the manufacturer supplies only nominal voltage and amp-hours, you can estimate nominal watt-hours by multiplying them:
Nominal battery energy = nominal volts × amp-hours.
For example, a hypothetical 48V, 14Ah battery works out to 672Wh. Use the manufacturer’s published Wh figure when available, and use nominal battery voltage for this calculation, not the higher voltage printed on a charging adapter.
Now think about your normal ride. Do you usually return almost empty, or do you just want enough extra charge for another afternoon?
That answer can save you from buying more equipment than you need. A full refill is a useful comparison, but your actual trip may depend on smaller top-ups.
Let’s size a top-up for one bike
Suppose your bike has a 500Wh battery. You expect to finish your ride at 20%, and you want to start the next one at 80%.
You’re adding 60 percentage points, so our simplified energy estimate is:
500Wh × 0.60 = 300Wh added to the bike battery.
The power station has to supply more than 300Wh. Its inverter uses energy, the charger has conversion losses, and the battery charging process and station operation add overhead.
For the examples in this guide, I’ll assume 75% overall efficiency from the station’s stored energy to energy added to the bike battery. That is a planning assumption covering the whole charging session, not a measured result or a guaranteed efficiency for these products.
At that assumed efficiency, adding 300Wh uses approximately 400Wh from the station: 300 ÷ 0.75 = 400.
I’d also leave 20% of the station’s nominal capacity unallocated as a trip reserve. To budget 400Wh while keeping that reserve, divide by 0.80:
400Wh ÷ 0.80 = 500Wh of nominal station capacity.
That gives us an illustrative energy minimum. We still need to check the charger’s electrical requirements, and I’d choose additional headroom if tomorrow’s ride depends on it.
Battery age, temperature, charger behavior, inverter overhead, and imperfect percentage displays can all shift the result. A percentage estimate is useful for planning; it isn’t a laboratory measurement of stored energy.
What changes if the battery is empty?
A full-equivalent 500Wh refill needs about 667Wh from the station at the same 75% assumption. Keeping 20% in reserve brings the nominal capacity estimate to about 833Wh.
That explains why a station labeled 500Wh shouldn’t be assumed to fully recharge a 500Wh bike battery. Matching the two printed capacities leaves no allowance for the charging process.
Here’s the reusable formula:
Station capacity needed ≈ bike battery Wh × fraction to add ÷ overall charging efficiency ÷ fraction of station capacity allocated.
Use 0.60 for a 60-percentage-point top-up, or 1.00 for a full-equivalent refill. In these examples, efficiency is 0.75 and the allocated fraction is 0.80. Don’t deduct those same losses or that reserve a second time.
What size Jackery would I consider?
I’d compare capacity first, then confirm that the approved charger fits the station’s output limits. A large inverter rating by itself won’t buy you more bike refills.
The following US models illustrate three useful capacity levels. The last column applies our same 75% overall charging-efficiency assumption and leaves 20% of nominal station capacity unused. Each station starts fully charged, with no other loads or incoming recharge.
| US power station | Nominal capacity | Rated AC output | Illustrative energy added to bike batteries |
|---|---|---|---|
| Jackery Explorer 600 v2 | 640Wh | 500W | 384Wh |
| Jackery Explorer 1000 v2 | 1,070Wh | 1,500W | 642Wh |
| Jackery Explorer 2000 v2 | 2,042Wh | 2,200W | About 1,225Wh |
Capacity and output specifications come from the manufacturer’s US manuals for the Explorer 600 v2, model JE-600A, Explorer 1000 v2, and Explorer 2000 v2. The bike-energy figures are calculations, not tested refill counts or manufacturer compatibility certifications.
For a single-bike top-up
The 600 v2 has enough nominal energy for our 300Wh top-up example under these assumptions. I’d consider that capacity class when you know your routine, carry the station in a vehicle, and don’t also need it for substantial campsite loads.
Its calculated 384Wh bike-energy budget does not cover a full-equivalent 500Wh refill with our reserve intact. That distinction matters more than the name on the front.
For a full refill and some flexibility
The 1000 v2’s calculated 642Wh bike-energy budget covers one full-equivalent 500Wh refill in this example. The remaining allowance gives more breathing room for charging variation or a smaller extra top-up.
It still isn’t a promise of unlimited riding. If you use part of the station’s energy for other equipment, that same energy is no longer available to the bike.
For two bikes or repeated charging
The 2000 v2 offers a calculated bike-energy budget of roughly 1,225Wh. Under our assumptions, that covers two full-equivalent 500Wh refills with some allowance left.
But two riders can use that energy surprisingly quickly. Before choosing it for a whole weekend, I’d write out the charging sessions.
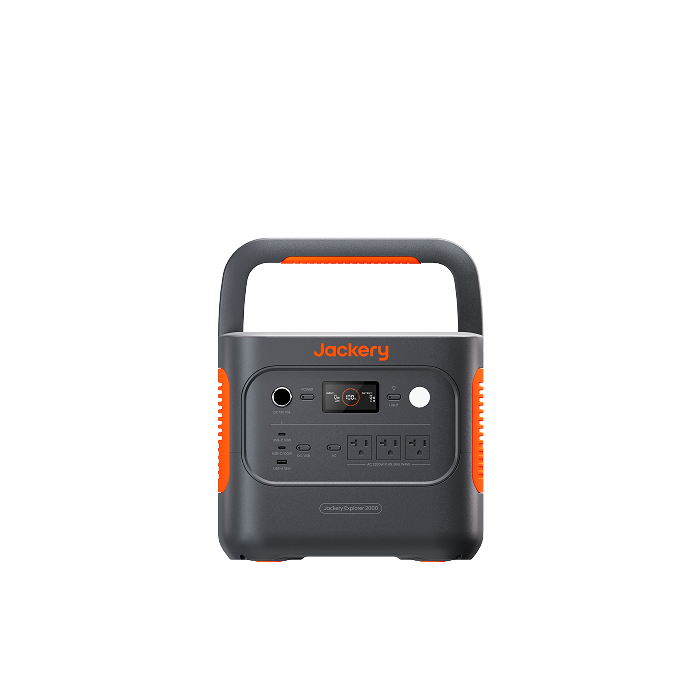
2,042Wh of nominal capacity. Budget for every bike and every charging session.
Manufacturer image.
Two bikes, two riding days: the weekend check
Let’s say you and your riding partner each have a 500Wh battery. You want to take both batteries from 20% to 80% after each of two riding days, with no station recharge between those sessions.
Each bike needs 300Wh added per session. Two bikes over two sessions means four top-ups:
300Wh × 2 bikes × 2 sessions = 1,200Wh added to the bike batteries.
At 75% overall efficiency, that needs about 1,600Wh from the station. Keeping 20% of nominal capacity in reserve makes the calculated station requirement 2,000Wh.
The 2,042Wh Explorer 2000 v2 sits just above that calculated threshold. Its 80% allocation is 1,633.6Wh, leaving only about 34Wh above our 1,600Wh charging budget.
I would treat that as a tight plan. There is very little room beyond the reserved 20% for higher-than-assumed charging losses or additional loads.
Suppose your other campsite use consumes another 250Wh from the station battery, including its associated losses. The trip now needs 1,850Wh from storage. Preserving the same reserve raises the nominal capacity estimate to about 2,313Wh.
At that point, I’d plan a reliable station recharge, reduce the required bike top-ups, or move to more battery capacity. I wouldn’t quietly count on perfect sunshine to close the gap.
If the station also supports your camper, our guide to running an RV with a portable power station can help you build the rest of that load budget.
Will a bigger station charge your e-bike faster?
Once a compatible station can comfortably supply the charger, additional inverter wattage generally doesn’t speed up the bike’s charging. The approved charger, battery, temperature, and charging controls set that pace.
The Bosch manual linked earlier gives an approximate six-hour charging time for a PowerTube 750 with the BPC3410 4A charger. That is a specific manufacturer combination, not a universal e-bike time or a test with the Jackery models above.
A station capable of supplying 2,200W does not force 2,200W through that charger.
I’d plan around the manufacturer’s charging-time information and your own observed routine. Charging may slow toward the end, so doubling the percentage you add doesn’t necessarily double the time exactly.
You also have a separate clock: how long it takes to recharge the power station. Its fast wall-charging claim describes refilling the station, not refilling your bike. Our solar generator charging-time guide explains that side of the schedule.
For a riding trip, I’d make sure your available charging window is long enough while you’re awake and present. A battery with plenty of capacity is only useful if there’s time to get that energy into the bike.
Can solar panels keep the bikes charged?
They can contribute, and this is where a solar generator can make a longer stay more practical. The usual arrangement is compatible panels charging the power station, with the bike’s approved charger connected to the station’s AC output.
Start by comparing a day’s energy production with the charging you need that day.
Here’s a deliberately simplified example: a 200W panel receives four peak sun hours, and 70% of that nameplate-based energy ends up stored in the station.
200W × 4 hours × 0.70 = 560Wh stored in the station.
“Peak sun hours” means an equivalent amount of solar energy at standard peak intensity. It does not mean that any four hours of daylight will produce this result. The 70% factor is an illustrative allowance for solar-side conditions and losses, not a forecast for your campsite.
Applying our separate 75% station-to-bike assumption would turn that 560Wh into about 420Wh added to the bike battery. That could cover our 300Wh top-up under the example conditions, but it would not cover a full-equivalent 500Wh refill.
Trees, clouds, season, panel positioning, input limits, and charging interruptions can change the outcome. I’d plan from the energy you can realistically collect at your location and keep a fallback for an important ride.
Our guide to how many solar panels you need helps with that energy budget. Before connecting panels, also check panel voltage, current, and connector compatibility.
If you want to charge the station while it powers the bike charger, verify that operating mode in the exact station’s manual. Our guide to using a solar generator while charging explains the tradeoffs. Incoming solar below the outgoing demand still leaves the station battery supplying the difference.
Set up somewhere you can charge properly
A riding trip adds dust, rain, hot vehicles, and limited space to a task that normally happens at home. I’d plan the charging location as carefully as the battery capacity.
The CPSC’s e-bike charging guidance says to use the supplied or manufacturer-recommended charger, remain present during charging, avoid charging while asleep, and unplug when finished.
At camp, that means fitting charging into time when you can supervise it. Plugging in before bed and leaving it overnight is not the plan I’d build around.
- Follow all three manuals. The bike battery, charger, and station each have location, temperature, and ventilation requirements.
- Respect indoor-only labels. A campsite table or a vehicle with an open hatch does not automatically meet those instructions. Bosch labels the example charger for indoor use.
- Allow a hot or cold battery to reach its permitted charging conditions. Follow its instructions instead of choosing a generic waiting time.
- Keep the charger clear and uncovered. Use the placement and surface the manufacturer specifies; don’t bury it in clothes or bedding.
- Check the equipment before connecting it. Don’t charge with a damaged battery, connector, or cord.
Once you’ve chosen a suitable spot, follow the manufacturer’s connection sequence, enable the station’s AC output, and confirm that the bike indicates normal charging. When finished, disconnect as directed and switch off unused station outputs to avoid unnecessary drain.
Keep the station at base camp, or carry it on the bike?
For an RV trip, a cabin stay, or rides that start and end at your vehicle, a power station can be a useful shared supply. It can support bike charging and other planned loads, provided you budget for all of them.
I’d think differently about a trip where every pound goes on the bike. The station, charger, and possibly panels add weight and bulk, and you still need an appropriate place and time to stop and charge.
If your only goal is extra riding range, compare that setup with a manufacturer-approved spare bike battery, where your bike supports one. Check the bike’s carrying limits and approved mounting or transport arrangements. The CPSC guidance linked above also calls for secondary batteries approved for the device.
If you drive between riding locations, charging the power station from your car may help replenish it. Work from the permitted input and realistic driving time; a short drive may replace only a small part of the energy you used.
Common questions before you pack
Can I charge a 48V e-bike from a 120V power station?
Potentially, yes, through the correct charger. The 120V rating describes the AC supply, while 48V describes the bike battery’s nominal voltage. The approved charger bridges those different requirements. Match its AC input to the station and its battery compatibility to your bike.
Can I use the station’s USB-C port instead?
Only if the bike manufacturer explicitly supports that charging method with the appropriate equipment. A high-wattage USB-C port does not establish compatibility with a bike battery. For a bike supplied with an AC charger, plan around that approved charger.
Can I connect a solar panel straight to the bike battery?
Use only a charging system specifically approved for that bike and battery. A plug that physically fits doesn’t provide the required voltage regulation, charging controls, or compatibility. The AC-charger route in this guide keeps the approved charger in the system.
Why did charging stop before the bike was full?
Check the bike and charger indicators, station battery level, AC-output state, and any temperature or fault messages. Also review the station’s energy-saving settings: low charging demand near the end of a session can matter on models that shut off light loads. Follow troubleshooting instructions rather than repeatedly resetting a fault.
How many extra miles will one charge give me?
I wouldn’t promise a mileage figure from station capacity alone. Your bike’s efficiency, assistance level, terrain, rider and cargo weight, and conditions all affect range. Use familiar rides to estimate your own consumption, then leave enough margin for a harder return journey.
Build the setup around your next ride
The most useful information is already close by: your bike battery’s capacity, the approved charger’s input label, and an honest idea of how much charge you’ll need between rides.
Start there. Allow for charging losses, keep a reserve, and count every bike and every charging session. Then check whether the station can supply the charger and whether your trip gives you a suitable place and enough time to charge.
For a modest top-up, a compact station may be enough. For two riders over a weekend, I’d want a written energy budget and a realistic recharge plan before packing.
If you want help comparing options, have your bike battery’s Wh rating and a clear photo of the charger label ready. Those details let us work toward a setup that fits your riding plans.


