







You’ve found a portable power station you like. Then you notice the solar panels cost extra, and you remember the panel in your garage—or spot another brand that looks like a better fit for your budget.
Can you use that one instead?
I’d want to answer that before you bought another panel, too. You might already have something useful. But the answer takes a little more than comparing the wattage or finding a cable that fits.
You can use a different solar panel with some portable power stations, provided the manufacturer supports the setup and the panel’s electrical output, connectors, polarity, and cables meet the requirements of that exact model. You cannot assume that any panel will work.
Let’s work through the decision together. By the end, you’ll know what to look for on the labels, when series or parallel connections change the answer, and which kind of cable actually solves your problem.
Start with the power station you actually own
The first thing I’d ask you for is the full model name. “Jackery 1000” or “my PECRON” leaves too much room for a mistake. Different generations can have different solar inputs, even when their names and battery capacities look similar.
Find the model number on the station and open the matching manual for your region. Look for the section called solar input, PV input, or DC input. PV simply means photovoltaic: electricity produced by a solar panel.
Write down these details:
- The supported solar voltage range and maximum permitted voltage.
- The current limit, shown in amps, and any separately stated short-circuit current limit.
- The maximum solar input power, shown in watts.
- The limits for each input port, as well as any combined limit.
- The required connector and the manufacturer’s supported panels or connection instructions.
Be careful to read the input specifications. A station’s 1,500W AC output tells you about powering appliances. It does not mean you can connect 1,500W of solar panels.
The battery’s watt-hour capacity is another separate number. That tells you how much energy it stores, rather than what its solar socket can accept.
If you’re still deciding which panel style suits your home, RV, or cabin, our solar panel buying guide covers that earlier choice. Here, we’re checking whether the equipment can work together.
Now find the label on your solar panel
Turn the panel over or find its specification sheet. The large “200W” on the product listing is useful, but the smaller electrical numbers will decide whether it’s a match.
These are the terms I’d help you find:
- Voc: open-circuit voltage. The panel’s voltage when it is illuminated but not supplying current to a load, under the stated test conditions.
- Vmp: voltage at maximum power. The voltage at its rated maximum-power operating point.
- Imp: current at maximum power. The current at that same operating point.
- Isc: short-circuit current. A separate specification used in equipment and circuit checks. You can read it from the label; you do not need to short the panel’s leads to find it.
- Connector details. The exact connector type and polarity, including any adapter supplied with the panel.
A panel marketed as “12V” will usually have operating and open-circuit voltages above 12V. That description often refers to the battery-system class it was designed around. Use the actual Voc and Vmp figures for your comparison.
Also check which output the numbers describe. A folding panel may have a main solar output and separate USB outputs. The USB socket’s rating does not describe the main solar lead.
If the label is missing and you cannot identify the panel, pause there. Guessing its electrical specifications is a poor way to protect the power station you just bought.
Check voltage before shopping for an adapter
This is the part I would slow down for, because an ordinary adapter cable cannot turn an unsuitable voltage into a suitable one.
Your panel needs to operate within the station’s supported solar range. Its highest expected open-circuit voltage must also stay below the permitted maximum. Read the manual’s wording carefully: a working-voltage range and an absolute voltage limit may be listed separately.
Suppose an imaginary station has a 60V maximum PV voltage. A panel with a 70V open-circuit rating is unsuitable for that input. Buying a different plug will not fix it.
The other direction matters, too. A panel can be below the station’s required starting or operating voltage. Adding a second identical panel in parallel will not raise that voltage enough to solve the problem.
Leave room for cold-weather voltage
Solar-panel voltage changes with temperature. Cold conditions can increase voltage; heat generally reduces it. The Department of Energy explains this temperature effect.
That means “it’s under the limit on the label” may not be the whole check, especially when panels are connected in series.
Here’s a calculated example using invented panel specifications:
- Each panel has a Voc of 28.5V at a 25°C cell temperature.
- Two in series have a combined rated Voc of 57V.
- Assume the panel’s Voc temperature coefficient is −0.30% per °C.
- At a cell temperature of −10°C, the simplified estimate rises by 10.5%: 57V × 1.105 = about 63V.
Those panels looked acceptable against a 60V maximum using the room-temperature ratings. Under these cold-weather assumptions, they exceed it.
This illustrates the calculation; it is not a universal allowance or a recommended array. Use your panel’s actual Voc temperature coefficient, the manufacturer’s calculation method, relevant tolerances, and the expected minimum conditions. The power-temperature coefficient is a different number.
If you cannot find that information, ask for the pairing to be checked before connecting it. Our guide to using solar generators in winter also covers the separate issue of whether the battery itself is warm enough to charge.
Check current and wattage next
Once the voltage works, compare the current and power requirements. These checks still apply even if the panel and station use the same connector.
For a panel’s rated maximum-power point, watts equal volts multiplied by amps. A hypothetical 200W panel could produce its rated power at 20V and 10A, while another could do so at 40V and 5A. Both say 200W. They present different electrical conditions to the station.
Read the current limit for the particular socket you plan to use. If a station has two solar inputs, its combined headline rating may require using both. You cannot automatically put the entire advertised input through one port.
You may also hear that a station will simply “take what it needs” from a larger solar array. Some manufacturers allow specified forms of overpaneling and limit accepted power. That permission is model-specific. A power limit does not cancel a voltage limit, a stated array-current limit, or a cable rating.
Check both operating-current and short-circuit-current requirements when the documentation specifies them. If the manual only lists a maximum current without explaining allowable panel sizing, get clarification instead of treating it as permission to exceed that number.
Once you’ve established a compatible setup, our guide to how many solar panels you need helps you plan the amount of charging you actually want.
Series and parallel change more than the cable layout
Imagine you have one panel that works and want to add another. This is where choosing the right connection matters as much as choosing the right panel.
Series connections add voltage. With matched panels under similar conditions, the string carries approximately the current of one panel. In a conventional arrangement, one panel’s positive lead connects to the next panel’s negative lead.
Parallel connections add current. Matched branches operate at approximately the same voltage, with their positive connections combined and their negative connections combined.
Here’s the difference using two identical, hypothetical 100W panels. Each has a Vmp of 20V, an Imp of 5A, and a Voc of 24V:
Different electrical output.
Illustrative matched 100W panels: each 20V Vmp, 5A Imp, 24V Voc.
48V open-circuit voltage
24V open-circuit voltage
These are simplified nameplate calculations for matched panels, not a wiring plan. Actual output varies, and array design also needs short-circuit current, cold-weather voltage, connector ratings, and any required protection checked.
Series might suit a station that needs a higher input voltage, provided the combined cold-weather Voc remains acceptable. Parallel might suit an input that can accept the extra current while staying at the original voltage.
Neither arrangement is automatically better. The station’s requirements decide which, if either, is appropriate.
With compatible conventional PV leads, a series connection may not require a separate combining adapter. A proprietary panel system may require a specific series accessory. Parallel arrangements generally need suitable branch connectors or a designed combiner, with protection appropriate to the array.
For the broader explanation, see our series vs. parallel solar panel wiring guide. Here, the key takeaway is simple: recheck compatibility whenever you add a panel or change the arrangement.
Choose the cable by the job it needs to do
Let’s make the accessory names less confusing. You might need to reach farther, change a connector, or combine panels. Those are three different jobs, and a cable that solves one does not necessarily solve another.
An extension gives you more reach
If your compatible panel’s cable cannot reach the station’s sheltered location, an extension may solve the problem.
For a setup using suitable solar connectors, our Rich Solar 10AWG extension pairs are an option to evaluate. Choose the required length, compatible mating connectors, and appropriate electrical ratings for the complete setup.
A longer cable adds resistance. At the same current, that means more voltage drop and wasted power. A thicker conductor can reduce those losses, but extra thickness does not correct a mismatched plug or excessive panel voltage.
I’d measure the route first and choose a practical length. Buying the longest option “just in case” can make a low-voltage solar setup less effective.
A parallel branch combines compatible panels
The Rich Solar RS-T2 2-to-1 parallel connectors are for combining two compatible branches in parallel. Rich Solar lists them at 30A and 1,000V DC in its manufacturer specifications.
Those are the accessory’s ratings. They do not give your power station, downstream adapter, or panel leads those same limits. Check the combined current through the entire shared section of the connection.
An adapter changes the connector
The Rich Solar RS-M2J solar-to-8mm adapter illustrates why the cable deserves its own check. Its manufacturer specifications list 14AWG cable, a 10-foot length, 13A rated current, and 36V.
A station accepting 60V would not make that 36V-rated adapter suitable for a 45V array. Likewise, “8mm” alone does not establish the exact barrel dimensions, pin arrangement, or polarity required by your station.
Check the complete connector specification and manufacturer support before choosing it. This is an accessory example, not approval to connect that adapter to every Jackery or other power station.
A Y shape does not always mean parallel
Jackery sells separate Anderson Y Parallel and Anderson Y Series connectors. The names describe different electrical arrangements despite the similar shape.
Jackery’s Anderson accessory documentation specifies that these Y connectors cannot connect SolarSaga 500X or 340X panels. It separately permits its Anderson extension cable with the 500X when total system voltage does not exceed 120V. Permission for the extension does not extend to the Y connectors.
There’s another easy mix-up: the Jackery Solar Panel Connector with three female inputs combines supported panels in series. Its manufacturer description explains the two- or three-panel function. The permitted panel count still depends on the exact station and panels.
That’s why I’d choose the connection arrangement first and buy the accessory specified for it. Socket count and product photographs are not enough.
Check the plug and polarity before connecting anything
Once the electrical specifications work, the physical connection still needs to be right.
Solar connectors sold as “MC4-compatible” should not automatically be treated as approved to mate with every similar-looking connector. Check the connector manufacturer and mating compatibility, along with the cable assembly’s ratings.
The same caution applies to Anderson-style connectors and round DC plugs. Connector housing, keying, dimensions, and contact arrangement matter. Two listings can use similar names while describing different parts.
Polarity means which contact is positive and which is negative. An adapter must preserve the polarity expected by the station. You cannot establish that from the cable’s color or from whether the plug slides into the socket.
For a beginner, the straightforward route is a documented cable assembly for the exact combination. If the connector or polarity information is unclear, send the model numbers and clear label photographs to the manufacturer or to us. A qualified person can verify uncertain wiring; buying successive adapters and trying them is not a compatibility test.
Follow the equipment’s connection and disconnection instructions. Do not unplug PV connectors while they are carrying current. A lit panel can remain electrically active even when the power station is switched off.
A supported starting point: Explorer 1000 v2 with a 200W panel
If you want a simpler purchase, start with a documented pairing. Our Jackery Explorer 1000 v2 and 200W solar panel kit is one example.

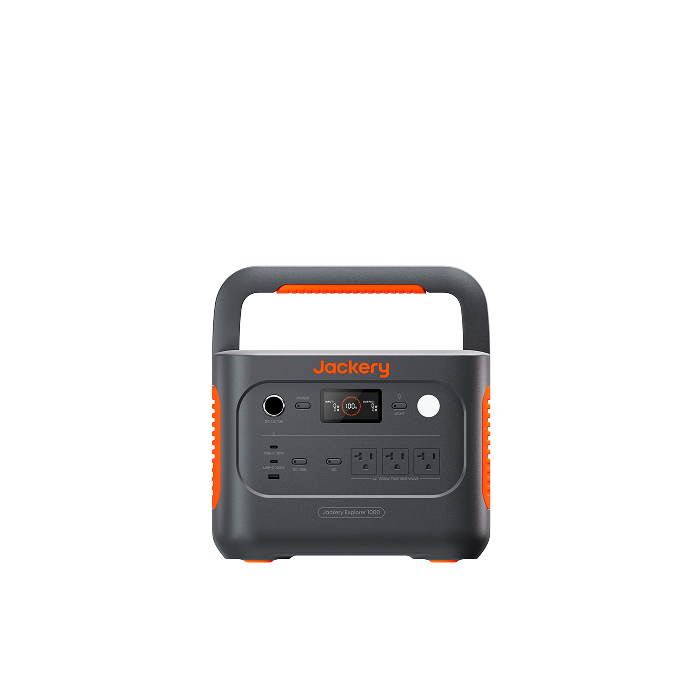
The US Explorer 1000 v2 manual, model JE-1000D, identifies two DC8020 inputs and permits a supported 100W or 200W panel to connect directly to either port. Its specifications list a 400W combined maximum in the higher working-voltage range.
For one supported 200W panel, you do not need a parallel branch or series combiner. Use the panel’s appropriate manufacturer-specified connection to one input.
Adding panels changes the setup. The manual gives a separate arrangement for two supported 100W panels on one port using the specified solar panel connector. That does not authorize two arbitrary 200W panels on the same connector.
Check the Explorer 1000 v2 manual for the complete instructions. It also cautions against attachments the manufacturer does not recommend or sell. Start with documented Jackery pairings rather than assuming another panel is supported because its numbers look similar.
What if the panel looks right but one part does not?
Here’s how I’d help you make the decision without turning it into a pile of cables you might never use.
First, separate a fixable connection issue from an unsuitable electrical setup. If everything is supported and the only missing piece is a correctly rated extension, you have a straightforward accessory problem. If the panel’s voltage is too high, you have a panel or array problem.
Consider this imaginary situation: a station permits up to 60V, the proposed array reaches 45V open circuit under the conditions being checked, and the planned adapter is rated for 36V.
Illustrative voltage check. Each part needs to pass.
in this example.
Too low for this array.
Does not override the adapter.
The station’s limit is not the only limit in that connection. That adapter is unsuitable. You would need to evaluate a different, properly rated and supported connection, or change the array. This example checks voltage only; passing it would still leave the other compatibility checks to complete.
Now imagine your station’s solar input needs a higher voltage than one panel provides. A parallel branch does not increase voltage. A permitted series arrangement might solve the low-voltage problem, but you must first check combined cold-weather voltage, current, connectors, and manufacturer instructions.
Finally, suppose everything appears to match electrically, but the station manufacturer does not support the panel or accessory combination. Ask for a documented recommendation. “The plug fits” and “someone online got it charging” cannot answer the support question for your equipment.
These are three different outcomes. Identifying yours before checkout saves more trouble than ordering a universal adapter kit and hoping one piece works.
Can you reuse an RV panel or a panel from your roof?
A separate RV panel may be worth evaluating. Its rigid frame does not automatically make it unsuitable for a portable station, just as a folding design does not automatically make it compatible.
Check whether its accessible output comes directly from the panel or from an existing charge controller. Many portable power stations already contain their own solar charge controller. A suitcase panel designed to charge a bare 12V battery through a separate controller may not provide the type of input your station expects.
Do not assume that feeding one controller’s battery output into another device’s solar input is supported. Look for a documented power-station connection. If that is not provided, ask the manufacturer rather than bypassing components yourself.
A panel that is already part of a rooftop system is a different project. Roof installations may include series strings, microinverters, optimizers, disconnects, and other equipment. A portable station’s DC solar input is not a general connection point for that system.
If you want to use installed rooftop solar for backup, have the installer assess a supported integration. Leave existing rooftop wiring and equipment connections to the people qualified to work on that system.
What I’d check if a compatible panel is charging slowly
You’ve checked the equipment, followed the connection instructions, and the display shows less power than the panel’s advertised wattage. That does not automatically mean you bought the wrong cable.
A panel’s rated output is measured under specified test conditions. Real sunlight, panel temperature, shading, orientation, and cable losses affect what reaches the station.
I’d work through these checks:
- Look at the sunlight. Put the panel in an appropriate, secure position with direct sun and minimal shading. Keep the station protected as its manual requires.
- Check the charging state. A nearly full battery, charging limits, or temperature protection can reduce accepted power.
- Confirm the port and configuration. A combined solar-input rating may require two ports and the specified arrangement.
- Inspect the supported cable route. Check for damage, insecure connections, and unnecessarily long runs. Follow the manual before handling connections.
If the station reports a fault, or a connector becomes unusually hot or smells abnormal, stop using the setup and get the cause checked. Repeatedly reconnecting it is not the next troubleshooting step.
For a realistic estimate after compatibility is settled, our solar generator charging-time guide walks through the energy and sunlight side of the calculation.
Questions you might still have
Do solar panels have to be the same brand as the power station?
Brand alone does not determine electrical compatibility. Some stations support suitable third-party panels, while other manufacturers specify their own supported combinations. Check the exact station’s instructions first, then the panel, cable, and connector specifications. Matching the electrical numbers is necessary, but it does not establish manufacturer approval.
Can I use a 200W panel with a station that accepts only 100W of solar?
Only if the manufacturer permits that panel configuration and all voltage, current, and connection requirements are satisfied. The station may limit accepted power in an approved setup. That does not make an excessive voltage safe or give you permission to ignore other input limits.
Can I mix a 100W panel and a 200W panel?
Possibly in a specifically supported design, but I would not make that a beginner’s default. In series, current mismatch can constrain output; in parallel, the branches must operate at a common voltage. Separate inputs may offer another option if their controller arrangement and instructions permit it. Check the actual specifications and topology before combining unlike panels.
Do I need a separate solar charge controller?
For a portable power station with a built-in solar charging input and controller, you normally use the approved panel connection to that input. A bare battery system has different needs. Follow the station’s diagram rather than adding a controller simply because one came with an RV or battery-charging kit.
Can one solar panel charge two power stations through a splitter?
Do not assume a panel-combining branch connector can be used backward for this. Two stations’ charging controllers sharing one panel is a different arrangement and needs explicit manufacturer support. A connector sold for combining panels does not establish that support.
Let’s check the match before you buy the cable
You do not need to become a solar installer to make a good purchase. You need a complete answer for the specific equipment you want to use.
Before you order, collect the power station’s full model number, the panel model and electrical label, how many panels you plan to connect, and the distance between the panel and station. Add the proposed cable or adapter’s exact name if you already have one in mind.
Then the question becomes concrete: can this panel, in this arrangement, connect through these parts to this input?
If you’d like help working through that, contact Grid Getaway with those details. We can help identify the documentation and accessories to check, including suitable Rich Solar options, and flag combinations that need manufacturer confirmation.
I’d rather help you choose the right connection once than have you discover the mismatch when you actually need your solar backup.


